
If you schedule client visits, showings or site calls in Google Calendar, you already have most of a mileage log. Every event has a date and a time, and most have a location. What is missing is the miles between one stop and the next, and a tidy place to add them up.
This guide shows how to build that log in Google Sheets, first by hand, then with Calendar Mapper, which does the lookups for you. Either way, start with what the log has to contain.
What the log needs
For each business drive, the IRS expects the date, the destination, the business purpose and the miles. The details are in What a mileage log needs to include. A calendar covers three of those four on its own:
- Date and time: the event’s start and end.
- Destination: the event’s Location field.
- Purpose: the event’s title or description, such as “Client visit: Acme Dental.”
Only the miles are missing. That is the part worth automating.
Step 1: Put a full address on every event
The log is only as good as the Location fields. “Acme” will not geocode; “30 Rockefeller Plaza, New York, NY 10112” will. Two habits make the rest easy:
- Paste the street address into Location when you create the event, or pick the suggestion Calendar offers.
- Put the reason for the visit in the title. It becomes your business purpose.
Events without a location, like video calls, are fine. They have no drive to measure.
Method 1: By hand
- Get the events into Sheets. Calendar Importer pulls events for any date range into a sheet with title, start, end, description and location. You can also extract them from event chips, one event at a time.
- Line up each drive. A drive runs from the previous stop to this one, so add a column that holds the previous event’s location, and decide where the first drive of each day starts, usually home.
- Measure it. With the Travel Formulas add-on, TRAVELDISTANCE returns the driving distance between two addresses:
=TRAVELDISTANCE(origin, destination). Fill it down the column. - Add it up. Add a subtotal per day and a total for the period.
This works well and you control every cell. The cost is the setup: the previous-location column, the first-drive-of-the-day rule, the subtotals, and redoing it each month.
Method 2: Calendar Mapper
Calendar Mapper is a Google Sheets add-on that does the same job in one pass.
- Pick calendars and dates. Tick the calendars to include and choose a start and end date.
- Say where you start. Enter your home or base address. The first drive of each day can start at home, at your first appointment or at a custom address, and the last drive can end at any of those. Two checkboxes send you home between events, or home at the end of each day.
- Click Import Now. Each appointment gets a row, each drive between stops gets its own row with the distance from Google Maps, and every day has a subtotal. A total for the whole period sits at the top and bottom.
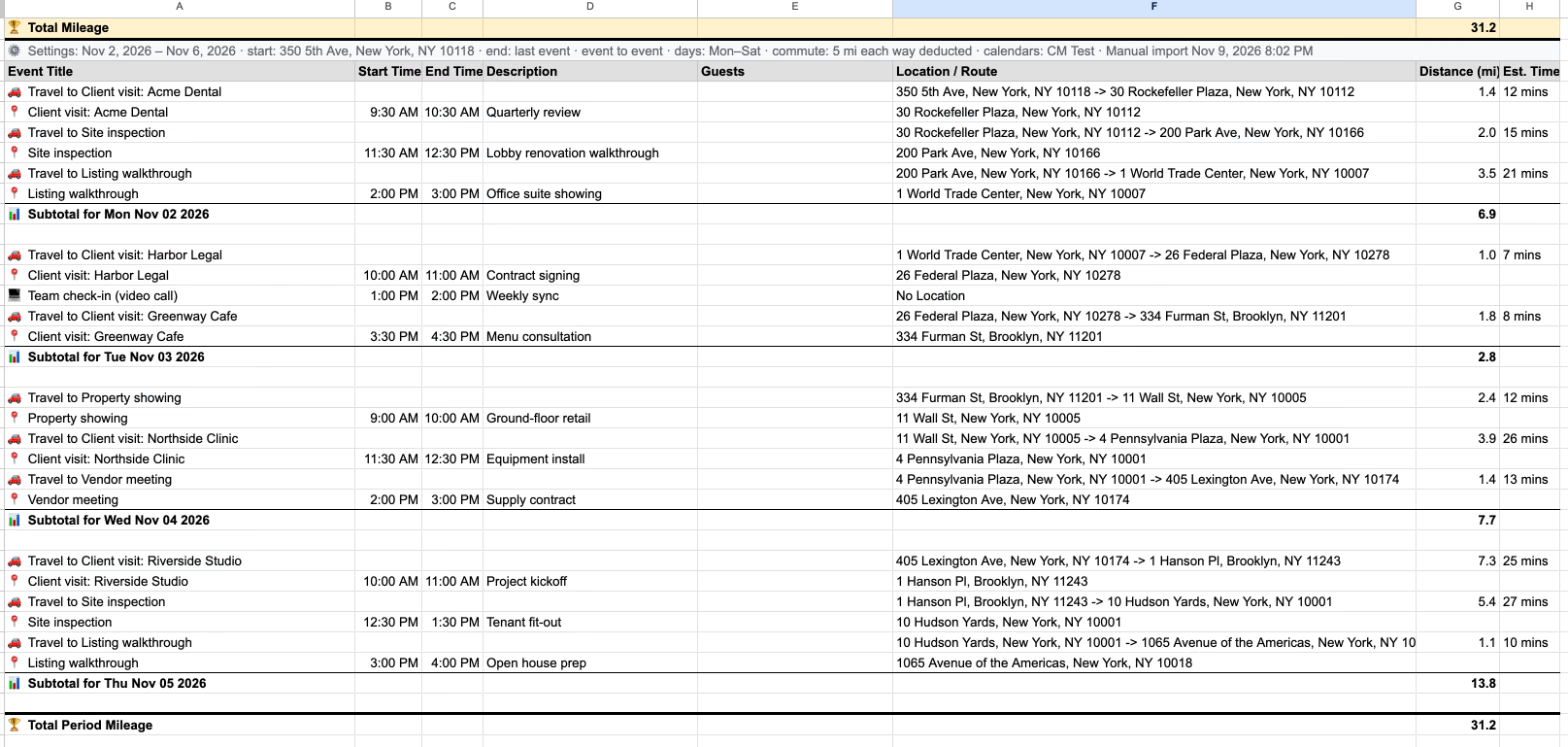
A few details that matter in practice:
- Appointments without an address are listed as “No Location” with no miles, so the log still matches your calendar.
- A commute deduction can be set once in User Settings. It is subtracted from each day’s first and last drive and shown as negative rows you can see.
- Work days are selectable, so weekend events can be left out.
- If a trip cannot be measured, the total says how many are missing instead of quietly showing a smaller number.
- A Trips tab holds the same drives as one flat row each, ready for a pivot table. See how to total miles by month and client.
- Auto-Update can refresh the sheet daily or hourly, so the log is current when you need it.
There is a 7-day free trial, then $18 a year for one person, with team plans for 2 to 20 people.
What neither method does
- It only knows what is on your calendar. A drive you never scheduled will not appear. Add it as an event with a location.
- It does not record odometer readings. It measures the route on Google Maps. If you keep odometer readings as well, record those yourself.
- There is no separate purpose column. The event title and description come along, so put the reason for the visit there.
- Google Maps has daily limits. A month of visits is well inside them. A very large import may need a second day.
- It is not tax advice. What counts as deductible business mileage depends on your situation, so ask your tax adviser.
Before you rely on the log
- Skim the days with the most stops. Does the order of drives match what you drove?
- Check for “No Location” rows that should have an address, then fix the event and import again.
- Do not delete rows from the mileage log. Its subtotals and total are written as numbers, so a deleted row leaves them overstated. Fix the calendar and re-import instead.
- Keep the sheet. Your records should be kept for as long as your return can be examined.
Frequently asked questions
Can I use more than one calendar?
Yes. Tick as many calendars as you like, for example one per client or one for work and one for a side business.
Does it work for a team?
Yes. One person buys a Small Team (2 to 5 people) or Team (6 to 20 people) plan and adds everyone else by email.
Can I total miles by client or by month?
Yes. Use the Trips tab and a pivot table. The step-by-step is in this guide.
Related: How to track your mileage for business taxes · Driving distance between two addresses in Google Sheets · TripTally for a list of addresses that is not on a calendar.